Sometimes it’s OK to Have a Damn Good Strop!
(Or ‘The Elusive Art of Stropping’, or ‘What You Will!’)
By
Mark Hordon (Beaver Bushcraft)
Stropping
Stropping is the finishing step in sharpening a blade.
By way of explanation, let us state from the offset that Stropping is the ‘Finishing’ or ‘Final’ step in the process of sharpening a blade, which cannot be accomplished properly until a blade has been initially, and successfully, sharpened. For that procedure you’ll have to have first read my previous article 'Razor Shark – Field Sharpening’ that was published in issue 71 Nov/Dec 17 of the Bushcraft & Survival Skills magazine or read it now by 'Clicking Here' … unless you can confidently sharpen a blade to a state that would actually benefit from being Stropped that is!
In this article I will explain about the stropping technique that I developed, over a number of years, as part of my own sharpening system.
A quick synopsis of that article
In the ‘Razor Shark – Field Sharpening’ article, which I have renamed 'Razor S.H.A.R.K. Sharpening', mentioned above, I describe a simple, yet foolproof, methodology for sharpening any cutting edge on the planet. The system was developed by me over a number of years in response to the numerous difficulties many of my students were having whilst learning and practicing traditional sharpening techniques. The main problem most beginners seem to encounter, including myself, when I was still a sharpening neophyte, is that whilst the traditional theory of sharpening is relatively simple grasp, the practitioner is required to quickly develop a moderately high skill set, if they are to achieve any degree of sharpening success. In other words it seemed to me, when using traditional sharpening systems that the degree of blade sharpness that is usually attained is exponentially related to the level of skill that the practitioner has mastered at that point.
I reasoned that there ought to be a method, as yet unknown, of sharpening that required only the simplest of sharpening paraphernalia that could easily be taught, learned, mastered and then practiced and would give outstanding results from the outset. It had to be a system that would give professional results, would meet, or even exceed, most peeps expectations of blade sharpness and yet would satisfy even a fanatical cutting edge fusspot like me!
Given a smidgeon of practice, the techniques described in the article would enable most everyone to at least attain a level of sharpness that I refer to as ‘Chef Sharp’ i.e. sharp enough to easily and cleanly cut through a squishy tomato, which seems to be the iconic symbol of measuring blade sharpness.
Taking a blade that would be considered to be Chef Sharp, up to the next level of sharpness i.e. making it ‘Razor Sharp’, would be the subject of another article, since it would require a degree of explanation that would make it into a story in and of itself; hence this article.
To - laconically - describe the benefits of this article, yes I do know a few big words! I would say that Stropping is: ‘The final 1% of the sharpening process that makes 99% of the difference!’
I would strongly recommend that you read that article before this one, since it will give you a strong background into the Razor S.H.A.R.K. Sharpening technique as a whole. If you would like to read the 'Razor S.H.A.R.K. Sharpening' article frist please 'Click Here'. If you want to get straight into Stropping, let's get started!

What is a strop and what’s it made from?
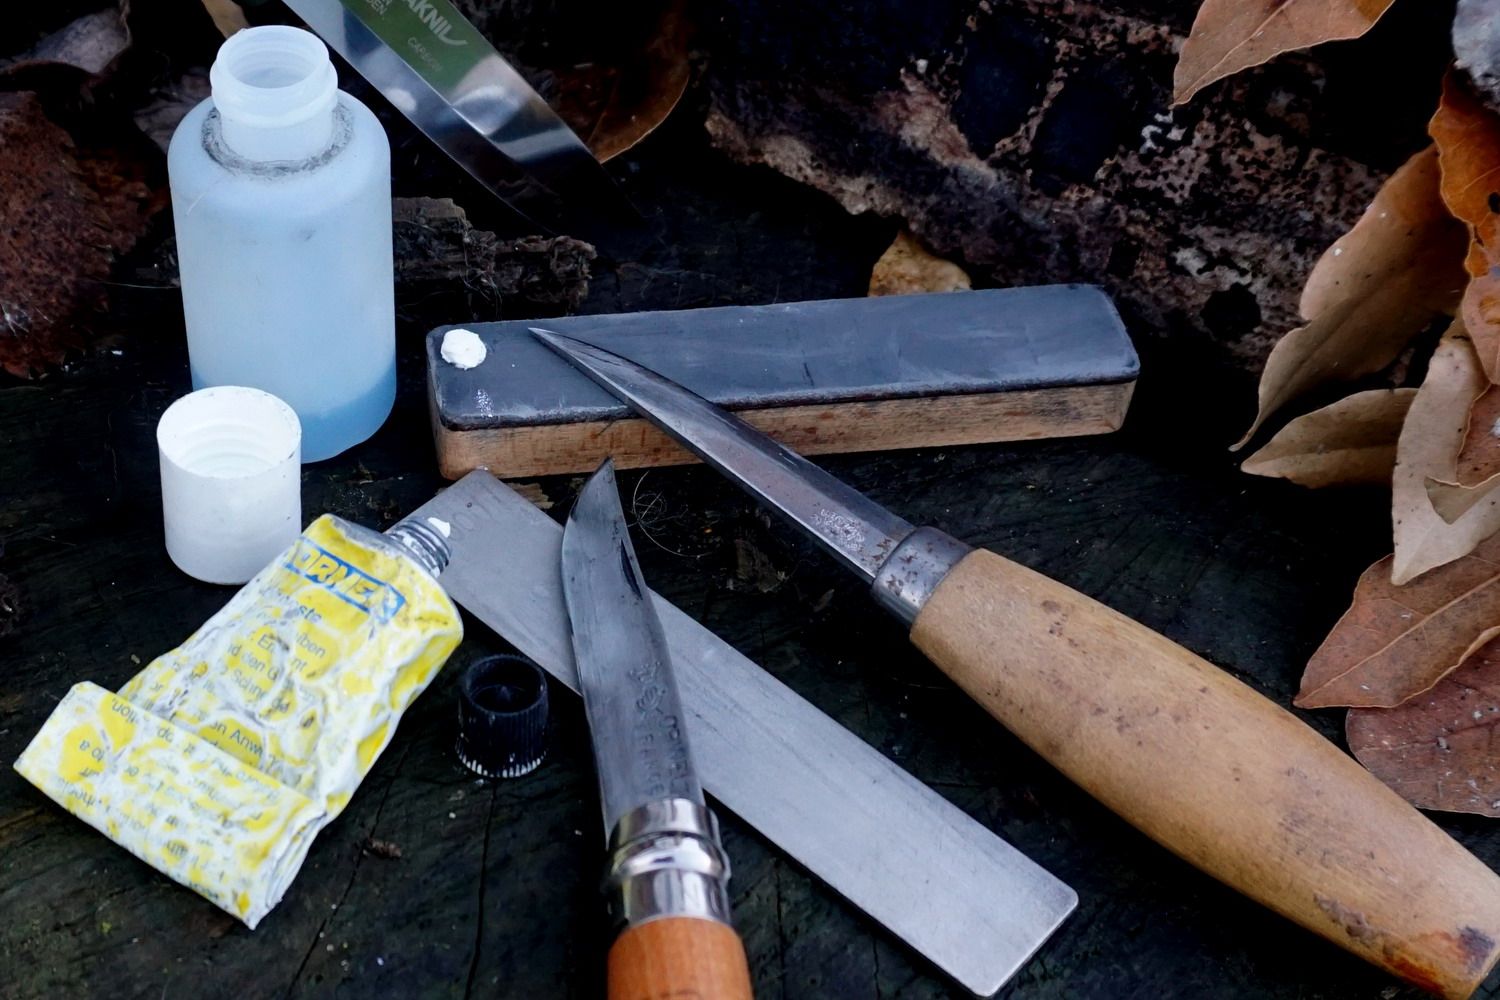
In essence a Strop is a sharpening tool that used in the final or finishing step of blade sharpening. It is usually made from a soft material, such as paper or card, a soft wood such as balsa or fibreboard, or even from cloth; however leather is often considered the best material to use. Such materials are often stuck on to a flat, solid platform, or ‘Platen’, such as wood, glass or steel to name but a few that adds stability to the stropping material and the process of stropping, thereby allowing easier stropping to take place.
Since Strops are generally made from soft materials, they are, by design, not really intended to actually sharpen a blade’s cutting edge. Nevertheless, they can, at a pinch, be said to add to the sharpness to a blade - given that enough strokes, say 50 to 100 and up, on the Strop are made. However, I would say that the extra sharpness gained would be so insignificant as to be considered irrelevant to the finished results; bearing in mind what a Strop is usually made from, and then comparing it’s softness to the hardness of tempered steel. Certainly I have never really noticed any significant difference in all of the decades I have been sharpening and cutting.
So, what is a strop meant to be used for if it doesn’t actually sharpen a blade’s cutting edge?
Well, stropping is mainly used to realign a blade’s cutting edge, by straightening out any micro-rolls or distortions that occur when a blade is used. Also, stropping will clean the blade, wiping away debris that may have become stuck on the cutting edge itself, thereby reducing the cutting efficiency of that blade. It does not actually sharpen a dull blade. Want to know more about Sharpening your blades?
So, what is a honing strop?
A Honing Strop, on the other hand, is a horse of different colour. A Honing Strop it is a standard Strop, preferably made from leather that has been coated, or ‘Loaded’ with an exceptionally fine abrasive. Thus, when a blade is repeatedly drawn, across a Honing Strop’s surface the addition of an abrasive will grind away metal from the blade, which is called ‘Honing’. Removal metal in this way effectively sharpens the blade; therefore, if no abrasive is present, it will not, because it effectively cannot!
Strops, abrasives, honing compounds and pastes
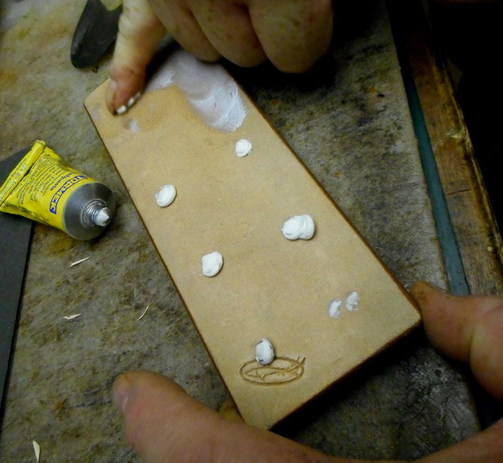
In essence, all you have to do to turn a Strop into a Honing Strop is apply a small amount of a Honing Compound to its surface and voila, it becomes a Honing Strop. The impossi-difficulty lies in turning a Honing Strop back into a standard Strop, because once and abrasive has been applied the surface has effectively become contaminated – permanently! It is therefore important to think carefully before you commit!
The abrasives that are usually used on Honing Strops are called Honing Compounds. The most common Honing Compound abrasives are essentially made from superfine materials such as Aluminium Oxide, Carborandum, Silicon Carbide, Glass, Boron Carbide or even Diamond, to name but a few. These abrasives are so small that they are measured in microns (μm). A micron being one-thousandth of a millimetre (0.001mm) or 0.000039 of an inch; another way of categorising the particulate size of such abrasives is to refer to the ‘Grit’ size. The bigger the Grit size number, the smaller the actual size of the abrasive and therefore the finer it is. To give you some idea of scale, the thickness of the average human hair is about 75μm whilst the abrasive particle size of most Honing Compounds usually ranges from about 7μm or 2,800 Grit, to say 1μm or 14,000 Grit, the best size, in my opinion, being about 8,000 Grit or 3μm (microns) in size. Abrasives are mixed with a sticky(ish) carrying medium such as water based thickening agents, oils or waxes that allow an even coating of abrasive to be applied to the surface of a Strop. Applying a Honing Compound to a Strop is called ‘Loading’ the strop.
The why, and when, should we hone strop?
Hone Stopping, or simply Stropping, is done for two main reasons. The first reason, as already stated, is that Stropping is that last 1% of the sharpening process that adds 99% to the sharpness of a blade. The second reason is that it is an easy-peasy way of extending the life of a blade’s cutting edge - by a long way - before it needs to be re-sharpened on a whetstone again. A double ‘W B thank you mam!’ you might say.
As to the ‘When’ should a blade be stropped? Well that is hard to say, since it depends on a whole host of variable and factors. It is like asking the proverbial question, ‘How long is a piece of string?’ Suffice to say that it is an inalienable fact of life that whatever a blade is made from, however well it is made and then sharpened; it will eventually start to become dull. It is, therefore, my most ardent advice that at the very second you notice that your blade is failing to glide through the material that is being cut, at the very second when you notice that you are using that little bit of extra force to make a cut, it is time to give the blade a quick Strop. If done at this point the blade can ninety-nine times out of a hundred be brought back to its peak level of sharpness. More on how this is done later.
If, however, you leave it just a fraction of a minute longer, it may well past the point of no-return i.e. that critical point where you just can’t bring it back to its former glory and will, therefore, have to go through the whole sharpened process again from the beginning.
So why a honing strop instead of a honing stone?
By way of explanation, let us say that the cutting edge of a blade, by virtue of it being made from metal, will always be somewhat softer than a Whetstone being made of … well Stone; so, a blade will always conform to the surface of a Whetstone. Conversely, a Strop, usually being made from a soft material such as leather being somewhat softer than the metal of a blade, will always conform to a blade’s cutting edge.
Since a Strop’s flexible soft surface, effectively wraps itself around a blade’s cutting edge, due to its elasticity, whilst the Honing Whetstone inflexible hard surface does not, Stropping a blade on a Strop, as opposed to a Whetstone, allows us to pay, markedly, less attention to blade stability and honing angle. This allows us to significantly increase the stropping speed, thereby saving us gobs of time, and effort to boot.
Having said this, here’s the ‘Rub’ that gives us pause; the very reason that makes the use of a Honing Strop so very fast and efficient, i.e. its flexibility and ability to conform to the cutting edge, is, ironically, the very same reason that prevents us from ever creating a ‘Scary Sharp’ cutting edge. To put it another way, the main disadvantage of using a Honing Strop over a Honing Whetstone, is the inability to ever achieve a ‘Scary Sharp’ cutting edge.
Try, if you will, pressing the tip of your finger gently into the muscle of your arm and then drag that finger down your arm, you will observe the way the skin on your arm flexes around the finger as the finger is moved. You will also observe that the skin on your arm does not suddenly flex, but is gently forced to conform to your finger, in a natural gentle curve like a ripple on a pond. It is the skin on your arm that gives to the point of your finger and not the other way around. If you now transmogrify your finger into a blade and your arm into a strop you will see, in your mind’s eye, how essentially a Strop works, albeit on a micro scale.
So why can’t a honing strop ever create a ‘scary sharp’ cutting edge?
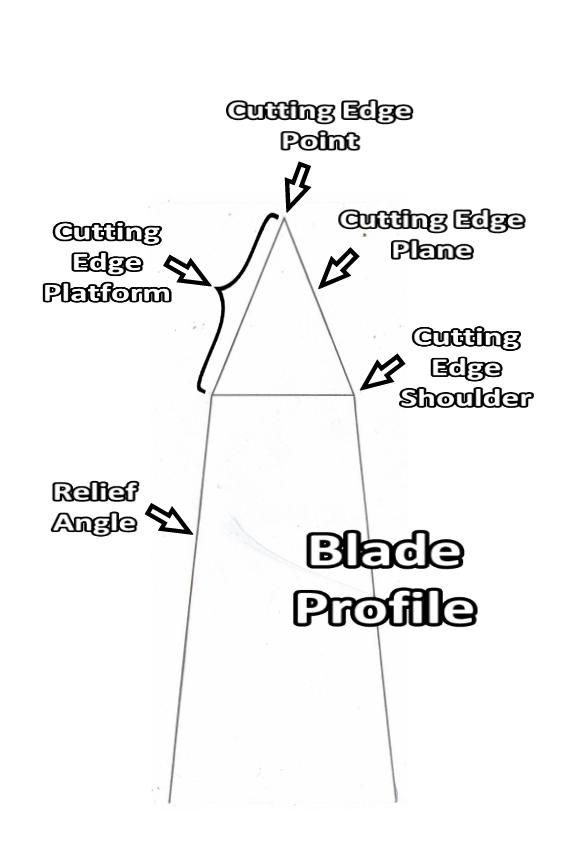
A blade’s actual cutting edge can be divided into three distinct parts. First is the ‘Cutting Edge Point’, second is the ‘Cutting Edge Plane’ and third is the ‘Cutting Edge Shoulder’, collectively they are called the ‘Cutting Edge Platform’ (see diagram ‘Blade Profile’).
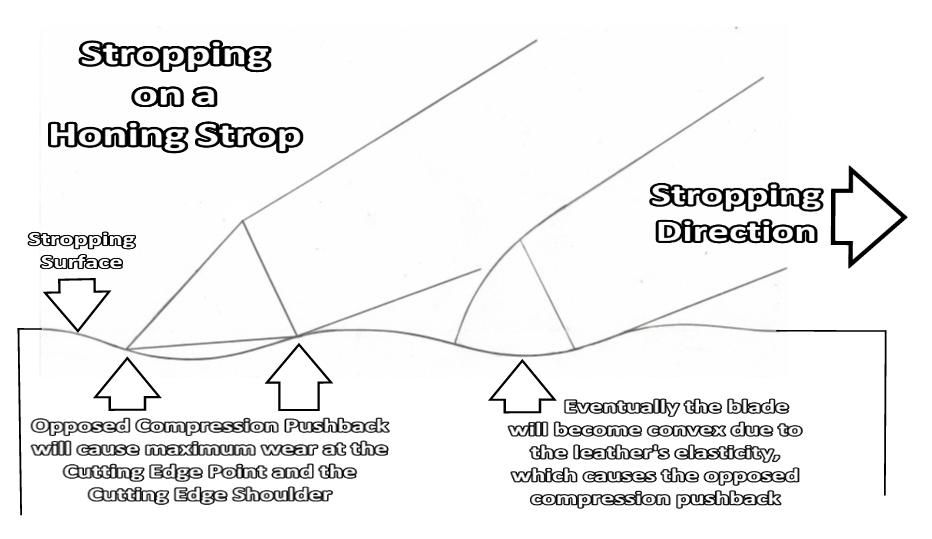
So, if a Strop ‘Gives’ under the pressure of a blade’s cutting edge, whilst stropping, because its surface is flexible, that surface needs to be somewhat elastic if it is to spring back into shape once the blade has passed. The elasticity of the Strop consequently causes a counter pressure that is pushed back into the blade which is called the ‘Opposed Compression Pushback’ (see diagram ‘Stropping on a Honing Strop’).
The Opposed Compression Pushback is maximised at two distinct points on the Cutting Edge Platform, namely at the Cutting Edge Point and at the Cutting Edge Shoulder. The increased pushback causes maximum abrasion at these two points, which eventually will cause the Cutting Edge Platform to become convex, or rounded. This ‘convexing’ of the blade’s cutting edge makes the it look like the tip of a ballpoint pen, effectively making the cutting edge angle so obtuse that it cannot ever be sharpened to a razor sharp level without it being flattened again on a Whetstone (see diagram ‘Cutting Edge Abrasion Compassion’).
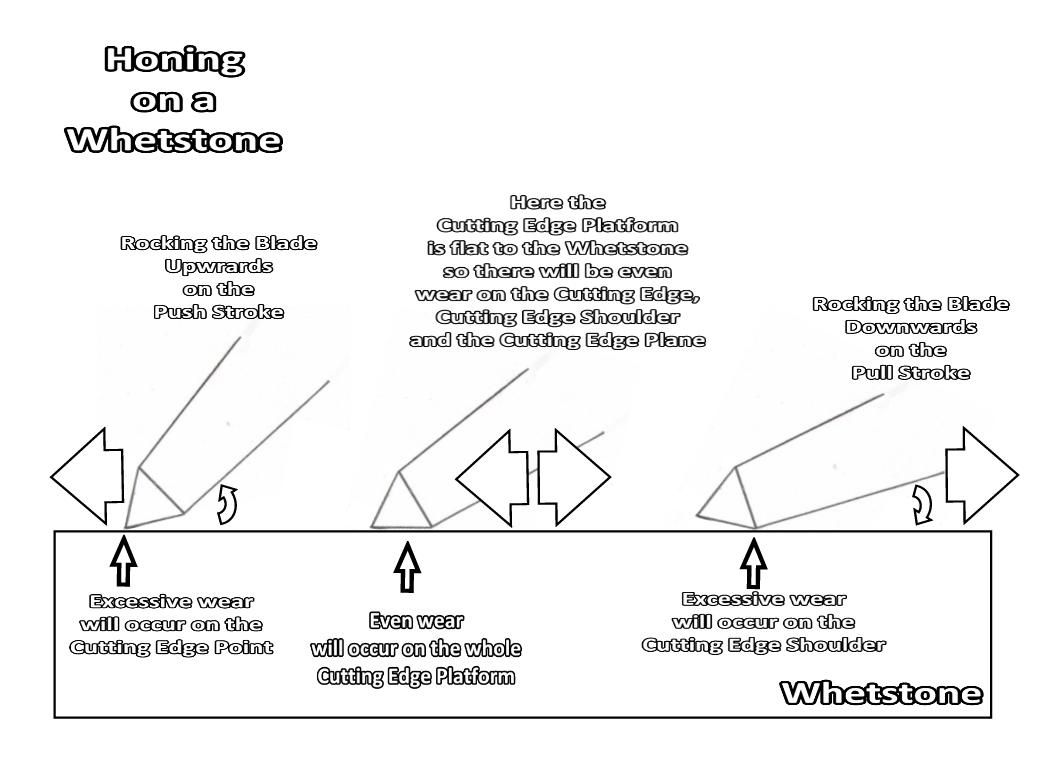
By contrast, when stropping your Blade’s cutting edge on the surface of a hard and inflexible Honing Whetstone, a Japanese Polishing Stone for example, it is the Blade’s cutting edge that gives to the stone and not the other way around. Thus by way of example, if you press the tip of your finger into the surface of a table, it is your finger that now gives to hard inflexible surface of the table.
With this in mind, when a blade is being stropped on a Honing Whetstone, the Cutting Edge Point, Cutting Edge Plane and the Cutting Edge Shoulder should all be abraded at the same time and with equal pressure, ideally allowing them to remain flat to each other. At first glance it might seem to be a much better option to use a Honing Whetstone as opposed to a soft flexibility of a Strop, but the rubs that gives us pause.
Thinking about it
Blade stability is of paramount importance whilst freehand sharpening on the hard, unforgiving and inflexible surface of a whetstone. So, when you bear in mind that a blade’s Cutting Edge Platform, may be anything from the width of a human hair (say about 100μm or 0.1mm) to the entire Relief Angle of the blade (as in a Samurai Sword), it is worth thinking about how effectively we can keep these three points perfectly flat if they are very small.
To keep the Cutting Edge Point, Cutting Edge Plane and Cutting Edge Shoulder, whilst freehand sharpening, all squared and aligned to each other on say a Samurai Sword would not a problem. This is because the Cutting Edge Platform on these swords is usually very broad and therefore allows us to sharpen them with a high degree of stability. However, if a Cutting Edge Platform were to be only 100μm or 0.1mm wide, as would be normal if we were to add a secondary bevel to the relief angle that would become the Primary Cutting Edge, we would have a real big problem with freehand sharpening stability because the Cutting Edge Platform is so very small.
Since we are all biological machines, made from flesh and bone held together with sinew and muscle all wrapped in a soft skin bag, we are designed to be a little bit bendy and pliable. Whilst this is great at stopping us from breaking with every bump and bang we encounter during our lives, it is a positive disadvantage when it comes to blade stability whilst freehand sharpening. It is an inevitable consequence that we add unwanted, albeit on a micro level, pitch, yaw and rotation to any ‘back and forth’ motion we make whilst sharpening a blade on a Whetstone (see diagram ‘Rocking the Cutting Edge’). It is, as they say, as inevitable as death and taxes and will happen to some degree or another no matter how skilled at sharpening we are, or will become.
On the whole I would say, that the advantages of stropping with a Honing Strop outweigh the extra sharpness that can be obtained by stropping on a Honing Whetstone, unless, that is, you put in a considerable amount of practice time to improve your skill level. The difference in sharpness will probably not be noticed, between the two techniques, especially on everyday cutting tasks. Using a Honing Strop will still get a blade’s cutting edge to be ‘Hair Popping Razor Sharp’; it will just not be ‘Scary Sharp’ is all.
What makes for a good strop?
The best quality Strops are, in my opinion, made from leather, but not just any old leather! You should know by now that it is not that simple! Yes, Strops can be made from lots of other materials, but good old fashioned traditional leather is by far the best and most durable material to make Strops from.
If the very best stropping results are to be obtained whilst using a traditional Leather Strop, we need to take a look some of the finer qualities of the leather that is to be used. Leather quality, density, thickness and the tanning process used to make the leather are all very important considerations when either buying or making a Strop: -
- Leather Quality: - The quality of a piece of leather largely depends on the injuries that were inflicted upon the animal hide whilst the animal was still alive. Injuries can be created in any number of ways including branding, cuts that cause scarring, insect damage in the form of horse flies, warble fly larvae or ticks etc. Any form of damage that is carried over after the hide has been tanned will affects the quality of that hide, which will inevitably affect its value. Surface imperfections cannot usually used in a finished leather product and are therefore usually cut around and thrown away.
- Leather Density: - The density, and therefore the usefulness, to a leather smith, of a piece of leather, varies according to the location the leather was taken from on a hide. Leather that is cut from say the Butt (i.e. the animal’s lower back) is in much more demand, by leather smiths, than the leather that is cut from say the Belly of a hide. This is because Butt leather is much denser than Belly leather, making it considerably stronger, more resistant to tearing and therefore much more durable.
- Leather Thickness: - The thickness of a piece of leather has an enormous impact on the elasticity of that piece of leather. As we have already seen the elasticity of the leather can have a marked effect on a blade’s cutting edge life span due to ‘Opposed Compression Pushback’ abrasion. Ideally the leather used on a Strop should be about 3 to 4mm thick. If the leather is too thick or it is too soft (see Leather Density, above), for example, there may be too much ‘give’ in the Strop which will cause the blade to distort the Strop to a higher degree. On the other hand if the leather, on the Strop, is too thin it will not ‘give’ enough, which will require greater care, skill and concentration, whilst stropping, if Cutting Edge Platform stability is to be maintained. This will reduce the overall speed of stropping (See Honing Whetstone).
- The Tanning Process: - There are two main tanning methods usually employed to industrially tan animal hides. Vegetable (Veg) Tanning and Chromium Tanning. Veg Tanned leather, when processed correctly into Stropping Leather, has a very fine and smooth velvety surface sheen that is much finer than I have ever seen on Chromium Tanned leather. This velvet sheen, or ‘nap’ as it is usually called, can be seen on the surface of a new Strop as a change in the surface brightness when you gently sliding a finger over the surface. It is the calibre of this nap that is so important to us whilst stropping with my system, hence my emphasis on quality Veg Tanned leather.
The ten million dollar secret to successful stropping
Wiping a blade across a Strop’s surface that has been treated with a honing compound will cause a small amount of metal to be removed with each stroke. It is the build-up of this metal swarf mixing with the abrasive that quickly turns the surface of the Strop grey. The thicker this residue, the surface patina, becomes the darker it will appear, the darker appears the better the Strop will be for detecting microscopic cutting edge imperfections. So, the big bucks secret to successful stropping is all down to the Strops surface patina colour.

Why?
Whenever a blade is used to cut something it will inevitably develop micro-chips, nicks, rolls and burrs along the cutting edge. If you then strop the blade you will clearly see these imperfections as a single or set of parallel lines on the surface of the Strop, much like looking at a ploughed field from a thousand feet up in the sky. These long singular or multitudinous parallel lines will become very apparent on the Strop’s surface, because the imperfections in the blade’s cutting edge will lift the leathers nap, thereby creating a noticeable high contrasting line or lines. These imperfections can then be mentally catalogued for future reference and then polished out on the Strop (see diagram ‘Lines on the Strop’ and photo ‘Strop with lines’).
How do we polish the blade’s cutting edge?
To polish a blade’s cutting edge you start by learning and then doggedly and persistently following the first two rules. The first two rules are as follows: -
- Never, repeat; NEVER push the blade’s cutting edge into the surface of a leather Strop, unless you want to cut or divide that Stop into two component parts.
- Always, I repeat; ALWAYS lead the blade’s cutting edge with the blade’s spine. In other words always move the blade’s cutting edge backwards along the surface of the Strop, unless you want to cut or divide the Stop into two component parts. To labour this point some more; never attempt to push the cutting edge into the surface of a leather Strop, as you would do when sharpening the cutting edge on a Whetstone, or you will simply cut into the surface of the strop, which I assure you, you do not want.
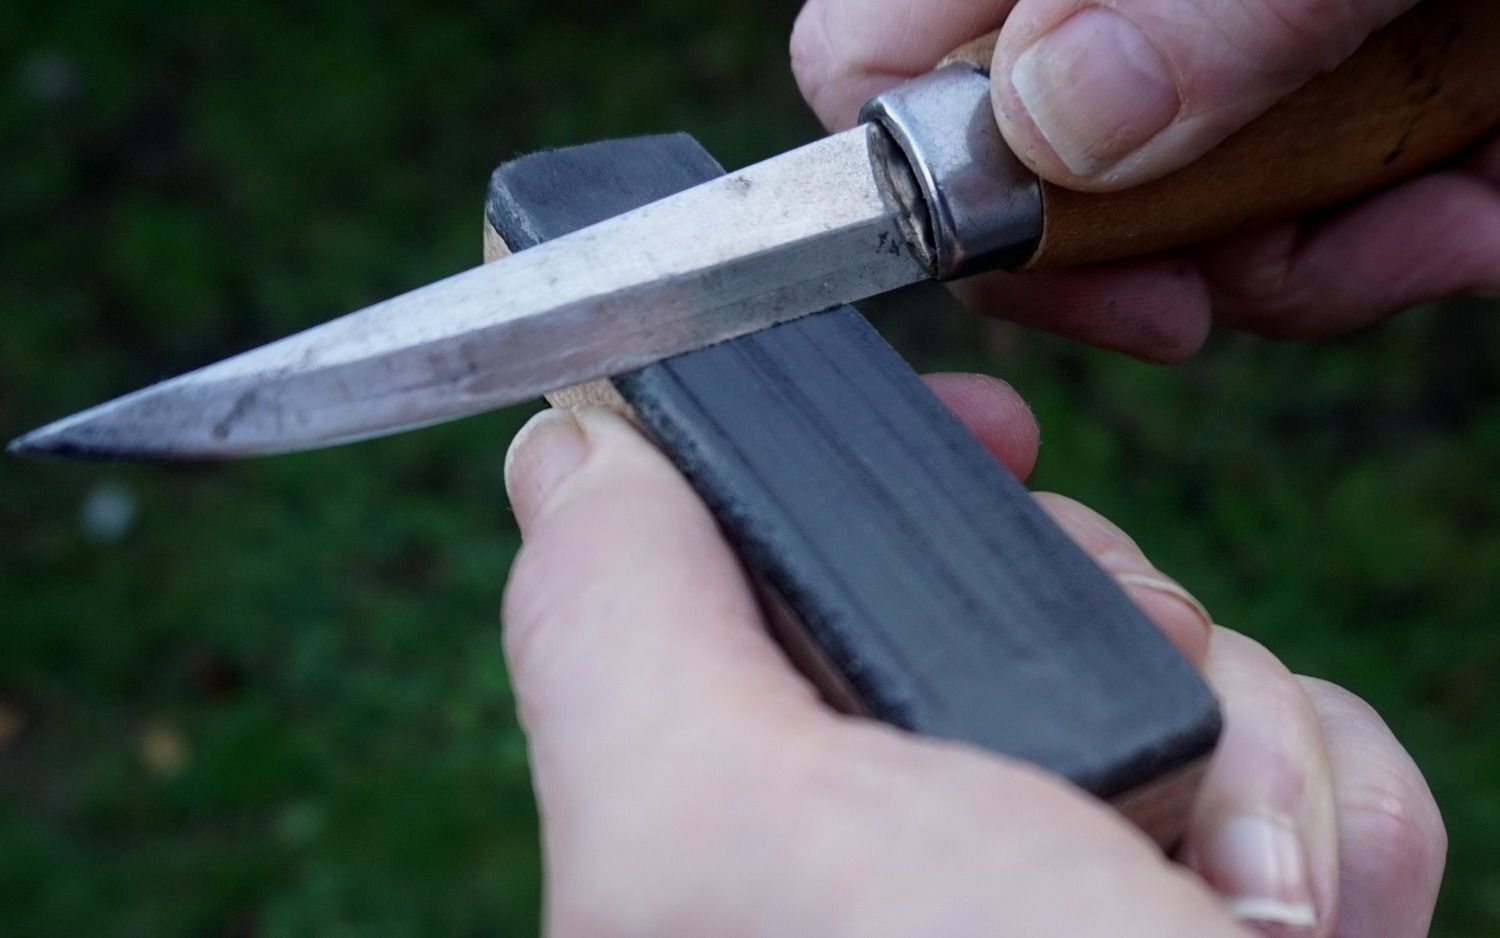
- Assuming you start stropping your blade at the far end of the Strop, it is important that you make sure that the blade’s cutting edge is facing away from you before you start to strop. Place the blade on the Strop by first touching the Spine of the blade to the strop and then lowering the side of the blade until the cutting edge is lying flat on the strop. This will prevent you from accidently cutting the Strop as the blade’s cutting edge touches down; this can easily happen so take care.
- Then lift the Spine of the blade so that the cutting edge is anywhere from about a 10° angle to say 45° angle to the Strop.
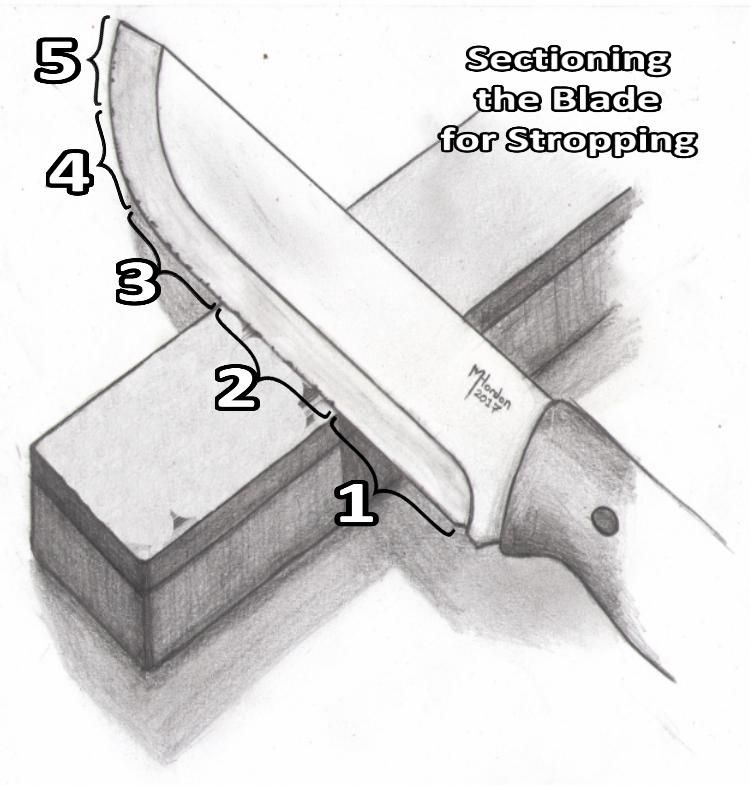
- Mentally divide the length of the blade up into sections. Each division along the Flat of the blade can be equal to the width of the Strop; whilst each section around the Belly can be made smaller to better control the stropping in that section. With this in mind, move the cutting edge along the surface of the Strop and keep that section of the blade on the Strop for the whole of that stroke. You will see that in the diagram ‘Blade Sections for Stropping’ section 1 has already been stropped.
- This is done by dragging the cutting edge across the surface of the Strop towards you, using light but firm downward pressure. If you do this slowly you may notice how the Strop is giving to the blade. If your blade actually cuts into the surface of your Strop, or your Strop divides itself into two separate pieces, you have not learned or remembered to first the first two lessons, as explained above.
- It is important that when you reach the end of the stroke, you make a conscious effort to correctly remove the blade from the Strop. This is done as if the blade were an airplane that is just taking off from a runway. NOTE: - It is a common mistake at this point to suddenly flick the blade off the Strop, by suddenly twisting the wrist. This flicking action drastically alters the stropping angle from the ideal 10 to 45 degrees to 90 degrees and more. This will cause the actual cutting edge to be abraded whilst it is perpendicular to the surface of the strop, which effectively dulls it. Since you are trying to sharpen the cutting edge and not dull it I would say that it is definitely something you really don’t want to happen.
- Look at the surface of the Strop and see if there are any lines that partially or fully traverse the length Strop where the blade has been; hopefully you will see these lines long before you actually remove the blade from the Strop. If you can see any lines they will be caused by the imperfections in the blade’s cutting edge and will need to be polished out.
- If you see any lines on the surface of the Strop, repeat numbers 3 to 9 until all you see is a smooth and slightly shiny Strop.
- When all you see is a smooth and slightly shiny Strop, you will have polished that section of the blade and therefore it is time to move along to the next section of the blade. Repeat number 3 to 10 on the new section of the blade.
- Keep repeating numbers 3 to 10, until each of the remaining sections of the blade’s cutting edge has been polished. Leaving the Strop smooth and slightly shiny along its whole length as the blade is stropped.
- Repeat the whole process, as above - numbers 3 to 13 – but this time do it on the other side of the blade.
- As a final check, swipe both sides of blade across the Strop again. Making sure that each side is still fully polished and leaves no lines. If any lines have suddenly appeared on the Strop you will need to start the whole process from numbers 3 to 13 again. This can sometimes happen because you may have just pushed a Burr from one side of the blade to the other as you are stropping.
‘Finishing’ and ‘Maintenance’ and when to dooooo it!
The last stage in the stropping process is also the ‘Maintenance’ stage in the stropping process; this is talked about in the ‘So why do we strop and when should it be done?’ section of this article. I usually refer to them as the ‘666 strops’, this is because it has wicked connotations and therefore makes a good tag to stick in the mind. Here’s how 666 strops are done: -
- Place the blade onto the Strop as described in ‘Polishing the Blade’s Cutting Edge’ above.
- Drag the cutting edge across the leather surface towards you, using light but firm pressure. If you see any lines appearing as the blade passes over the Strop, you will need to repeat the above, numbers 3 to 13 again until all you can see is a smooth slightly shiny Strop.
- This time as you are moving the blade’s cutting edge along the surface of the Strop, try to swipe the entire length of the blade, from Heel to Point, across the Strops surface with each stroke.
- Again, it is important to remember, if you don’t want to dull the blade’s cutting edge, that when you reach the end of each stroke, you consciously, and carefully, remove the blade from the Strop as if the blade were an airplane that is taking off from a runway.
- At the end of the first stroke, move the blade back to the far end of the Strop, and repeat the procedure (numbers 14 to 18) another five times on this side of the blade - making a total of 6 strokes on this side of the blade.
- Turn the blade over so that the cutting edge is now facing you and place it at the end of the Strop that is closest to you. Repeat numbers 14 to 18 on this side of the blade; remembering to apply the first two rules.
- The next step is to complete a further six strokes - three strokes on each side of the blade - alternating one stroke per side until six full strokes have been completed. When this has been done the whole stropping process will have been completed and your blade should now be ‘Razor Hair Popping Sharp’ or as sharp as you can make it.
When the above steps have been completed your blade will be as sharp as you can get it at your current skill level, however, with practice the blade will become even sharper. Hopefully you will want to keep your blade in its peak condition for as long as possible; to this end it is important to judge the exact moment you need to give it another 666 Strops.
All things being equal the 666 strop will easily bring the blade back again, but remember to look for the tell tail signs of blade damage when you first begin to strop the blade and immediately repeat steps 3 to 20 if you spot them. If you ignore them, and continue to use the blade, you may well have to re-sharpen the blade from the very beginning again.
Ok Mr Hordon, I have done all this, but my blade is still not ‘Razor Hair Popping Sharp’!
If your blade is not ‘Razor Hair Popping Sharp’ by this time then it will be for one of the following reasons: -
- You missed something out of the Sharpening and Stropping process; therefore it is not my fault!
- You made a mistake somewhere along the line; therefore it is not my fault!
- You did everything correctly and just need a little more practice; therefore it is not my fault!
- You did everything correctly and it is therefore my fault! In which case, I most humbly apologise and suggest that you read a, b and c again!
Tips & Hints
Here are a few hints and tips that may help you to get better results.
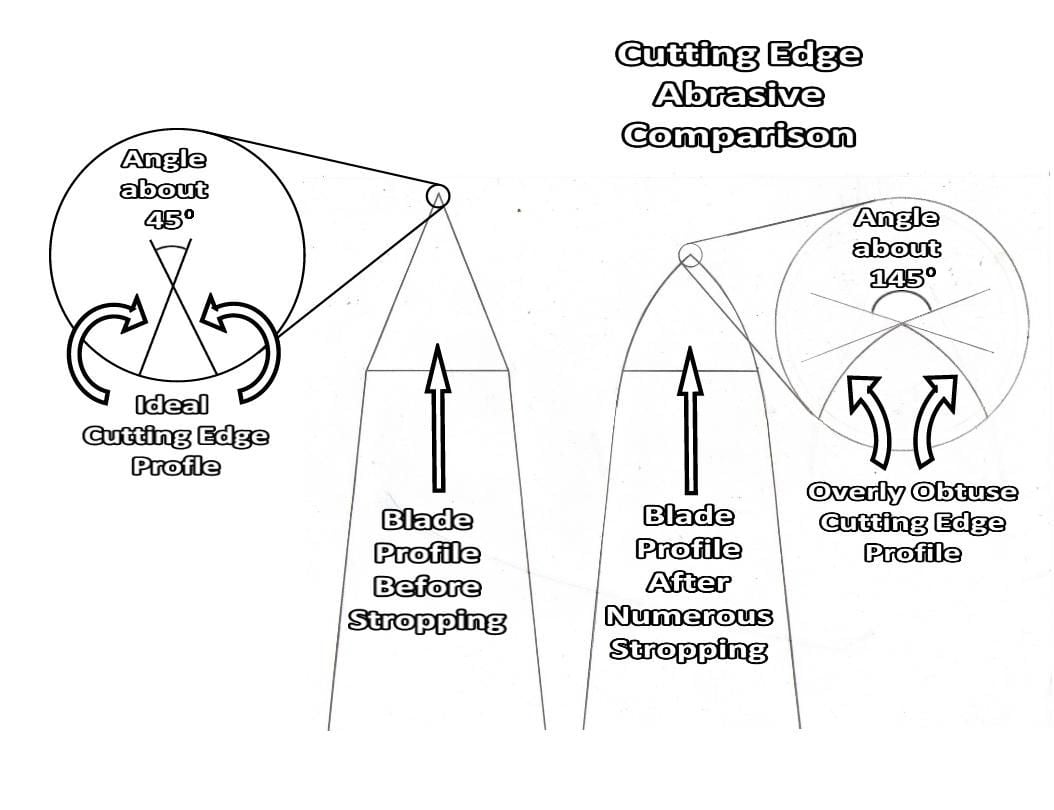
- Every cutting edge that has ever existed, or will ever exist, will, or has, become duller with use … this is an inalienable fact of life that must be dealt with, like it or not! It is also true that stropping a blade will, after each stropping session, steadily reduce the cutting edge’s potential for sharpness, because the Cutting-Edge Platform will steadily become more and more convex. Eventually the Cutting-Edge Point will have such an obtuse angle that its potential for sharpness will effectively be reduced to zero (see diagram ‘Cutting Edge Abrasion Comparison’). When the blade gets to this state, and it surely will, it will need to re-sharpen and with a Whetstones. There is no other way around this unless you don’t mind having a dull knife that is. It is considerably easier to re-sharpen a blade that has just reached this point, than to re-sharpen a blade that has been ignored, due to procrastination. Ignore this advice at your peril!!!
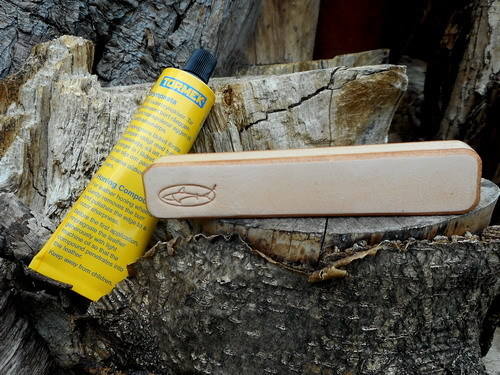
- Always use a good quality Honing Compound in the form of a ‘Paste’, such as Tormek Honing Paste or our specially formulated Shark Sharpening Solutions - Honing Paste (hint, hint!). Both of these products are at what I consider to be the optimum abrasive Grit or Micron (i.e. 8,000 Grit or 3µm) size, they are both easily loaded onto the surface of a Strop (being easily spread it like warm butter on bread) and neither will damage the Strops surface patina. Just a point here, but I try not to use Wax based Honing Compounds, whenever possible, because they can be quite hard. This becomes a problem when crayoned onto the Strop since they can easily scrape off the Strop’s delicate surface patina. Consequently, this can prevent you observing blade cutting edge imperfections on the Strop’s surface (see ‘The Ten Million Dollar Secret to Successful Stropping’).
- If, after 10 to 15 strokes, across the Strop, a blade’s cutting edge imperfections cannot be polished out, which will occasionally happen. It is strongly advised that you go back several steps in the sharpening process preferably to the point as described in the ‘Now to the Sharpening’ section of my previous article in the ‘Razor Shark – Sharp Field Sharpening’ in issue 71 Nov/Dec 17 of the Bushcraft & Survival Skills magazine. Just a slight ‘tickle’ with a 1,000 grit side of the Diamond Whetstone on the damaged area of the blade’s cutting edge will be more than sufficient to remove any persistent imperfections instead of abrading it or them away with the Honing Strop. Yes! You will need to go through the whole of stropping process again from the beginning, however, going backwards will, ironically, save you’re a whole gob of time. Stubbornly persisting in polishing out any imperfections with the Strop may seem like the easiest option at the time, but trust me when I say it is not. This is because bloody-minded, dogged stropping will easily cause you to round off the blade’s Cutting Edge platform as discussed in ‘So Why Can’t a Honing Strop Ever Create a ‘Scary Sharp’ Cutting Edge?’, thereby dulling the blade beyond the scope of the Honing Strop to bring it back, which will, as a consequence, require you to re-start the whole sharpening process again. Beside that, it will cause unnecessary wear and tear on the Strop thus decreasing its lifespan.
- You should re-load your Strop with new Honing Pastes whenever you feel that it is necessary – an obvious statement, but nonetheless true. Usually this can be judged when the surface of the Honing Strop begins to feel slightly waxy; in other words, you start to feel that there is excessive resistance, or drag, whilst stropping which occurs when the abrasive particles in the Honing Compound begin to breakdown. If you think about it the abrasive particles act, albeit at a microscopic level, like mini ball bearings, that reduce friction allowing the blade to more easily glide across the Strop’s surface. When resistance is felt, it may be time to re-load your Strop.
- Whilst the Strop’s patina is essential in telling you the condition a blade’s cutting edge, it is nonetheless a somewhat dirty, to the touch, substance that can easily be rubbed off onto your fingers and clothes. It is advised, therefore, that you store your Honing Strop in a small bag or wrap it in a cloth after use. Wrapping, or bagging, your Strop will also protect it from any airborne contaminants, such as dust or grit, which might be a larger Grit size than the Honing Compound which can interfere with the stropping process.
In Conclusion
A Honing Strop is only ever used as ‘the finishing step in sharpening a blade’, it is, therefore, vitally important to remember that a Honing Strop cannot ever sharpen an already dull blade. If your blade’s cutting edge looks like a piece of round-bar and you strop it on a Honing Strop it will simply look like a well-polished piece of round-bar! It is essential that a blade’s cutting edge be as sharp as it can possibly be, before a Honing Strop is ever considered for use.
Please read my previous atricle 'Razor S.H.A.R.K. Sharpening' (Simplified Honing for Advanced Razor-sharp Knives), which demonstrates the simple principles, easily learned and mastered on how to simply and easily sharpen any Cutting Edge to a Razor Edge.
I have made several videos that demonstrate the system used in this article, which can be seen on our web site www.BeaverBushcraft.co.uk in ‘Videos and Articles’ under ‘Sharpening Videos by Mark Hordon’
Thanks for reading this article, and my previous one if you did so. If you have any questions I would be delighted to answer them for you, please send any questions to [email protected].